Author

Sara

Browsing

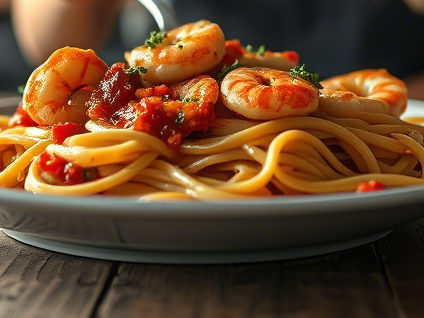
How to Make Shrimp Marinara Pasta: 5 Simple Steps to Deliciousness

When it comes to cooking a meal that’s both quick and satisfying, shrimp marinara pasta is one of the best options you can choose. This Italian-inspired dish is loaded with flavor, featuring plump shrimp, a rich marinara sauce, and perfectly cooked linguine. Whether you’re making dinner for yourself or hosting a casual dinner party, this recipe is sure to impress.

In this guide, you’ll learn how to make shrimp marinara linguine in 5 simple steps that’ll guarantee success every time. From preparing the shrimp to serving up the final dish, we’ve got you covered.


Prep Time, Cook Time, and Total Time

Before diving into the recipe, let’s take a quick look at the prep time, cook time, and total time. Knowing how much time you’ll need helps you plan your meal more efficiently.

ActivityTime
Prep Time10 minutes
Cook Time20 minutes
Total Time30 minutes

Ingredients for Shrimp Marinara Pasta

To make this delicious shrimp marinara pasta, you’ll need a few simple ingredients. Here’s a quick rundown:

IngredientQuantity
Linguine8 oz
Shrimp (peeled and deveined)1 lb
Olive oil2 tbsp
Garlic, minced3 cloves
Marinara sauce2 cups
Red pepper flakes1/2 tsp
Fresh basil (optional)1 tbsp
Parmesan (optional)For garnish

With these ingredients, you’re well on your way to preparing a mouthwatering shrimp marinara linguine dish!


Step 1: Prepare the Shrimp

The first step in making shrimp marinara pasta is to properly prepare the shrimp. It’s important to clean and season them before cooking to ensure they turn out perfectly.

  • Clean and Devein the Shrimp: If you’re working with raw shrimp, start by peeling them and removing the veins. This step ensures that your shrimp are tender and free of any unwanted textures.
  • Season the Shrimp: Lightly season the shrimp with salt and pepper. For a little extra kick, you can also sprinkle in some red pepper flakes.
  • Cook the Shrimp: Heat a bit of olive oil in a skillet over medium-high heat. Add the shrimp and cook for 2-3 minutes per side, or until they turn pink and opaque. Be careful not to overcook the shrimp—they cook quickly, and you don’t want them to become tough.

This is a crucial step because properly cooked shrimp are the star of the dish. Overcooked shrimp can become rubbery, which will impact the overall texture and flavor of your pasta. Once the shrimp are done, remove them from the skillet and set them aside for later.


Step 2: Make the Marinara Sauce

Next, it’s time to make the marinara sauce. You have two options here: use a store-bought marinara sauce or make your own. We’ll guide you through both options, so you can choose whichever works best for you.

Option 1: Using Store-Bought Marinara Sauce

If you’re pressed for time, a good-quality store-bought marinara sauce will work perfectly. Look for one with minimal added sugar and preservatives, so the flavor remains rich and authentic.

Option 2: Homemade Marinara Sauce

Making your own marinara sauce is easy and only requires a few ingredients:

  • Olive oil: Sauté 3 cloves of minced garlic in 2 tablespoons of olive oil until fragrant (about 1 minute).
  • Tomatoes: Add 2 cups of canned crushed tomatoes and bring the mixture to a simmer.
  • Seasonings: Season with salt, pepper, a pinch of sugar (to balance acidity), and red pepper flakes for a touch of heat. Simmer for 10-15 minutes, allowing the flavors to combine and deepen.
  • Herbs: Fresh basil can be added at the end for a burst of fresh flavor.

While store-bought marinara is a quick solution, homemade marinara offers a richer and more personalized flavor profile.


Step 3: Cook the Linguine

Now it’s time to cook the linguine, the perfect base for your shrimp marinara pasta. Here’s how to get it just right:

  • Boil Water: Bring a large pot of salted water to a boil. The salt helps flavor the pasta.
  • Cook the Linguine: Add the linguine to the boiling water and cook according to the package instructions (usually around 8-10 minutes for al dente).
  • Reserve Pasta Water: Before draining the pasta, be sure to save about a cup of the pasta cooking water. This starchy water will help thicken the sauce and ensure it clings to the linguine.
  • Drain the Linguine: Once the pasta is al dente, drain it, but don’t rinse it. You want to keep that starchy coating that helps the sauce adhere.

By cooking the linguine properly, you’ll ensure the perfect texture—neither too soft nor too firm.


Step 4: Combine Shrimp and Sauce

With the shrimp, sauce, and pasta all ready, it’s time to combine them into one delicious dish.

  • Heat the Sauce: In a large pan, heat your marinara sauce over medium heat. If the sauce has thickened too much, add a little of the reserved pasta water to thin it out.
  • Add the Shrimp: Once the sauce is heated through, add the cooked shrimp back into the pan. Stir to combine and let the shrimp simmer in the sauce for 2-3 minutes to absorb the flavors.
  • Toss in the Pasta: Add the drained linguine to the pan and toss everything together. If the sauce seems too thick, add more reserved pasta water to achieve a silky texture.

This is the moment when all the elements of the dish come together. The shrimp soak up the marinara sauce, and the linguine becomes coated with that delicious, savory goodness.


Step 5: Serve and Garnish

Once everything is combined, it’s time to plate and garnish your shrimp marinara pasta.

  • Plate the Pasta: Serve the linguine on individual plates or in a large serving bowl. Use tongs to make sure the pasta is neatly arranged.
  • Garnish: Add a sprinkle of fresh basil for a pop of color and flavor. You can also grate some Parmesan cheese over the top for extra richness.
  • Add Extra Spice: If you like a bit of heat, sprinkle a few more red pepper flakes on top for an extra kick.

Not only does garnishing your dish make it visually appealing, but it also adds layers of fresh flavor that elevate the overall experience.


FAQs

What is the best type of pasta for shrimp marinara?

Linguine is the classic choice for shrimp marinara because its flat surface holds the sauce beautifully. However, spaghetti or fettuccine will work just as well. Choose your favorite!

Can I use frozen shrimp for this recipe?

Yes, frozen shrimp can be used. Just make sure to thaw them thoroughly before cooking. You can thaw shrimp quickly by placing them in a bowl of cold water for 15-20 minutes.

Can I make shrimp marinara pasta ahead of time?

While shrimp marinara pasta is best served fresh, you can prepare the sauce and shrimp in advance. Store them separately in the fridge for up to 2 days, then reheat and toss with freshly cooked pasta when ready to serve.

How do I adjust the spice level in this recipe?

For a milder dish, reduce or omit the red pepper flakes. If you love a spicy kick, you can add extra red pepper flakes or even a pinch of cayenne pepper.


Conclusion: Enjoy Your Shrimp Marinara Pasta

There you have it! You now know how to make shrimp marinara linguine in 5 simple steps. Whether you’re cooking for a crowd or enjoying a quiet meal at home, this dish is guaranteed to satisfy. With succulent shrimp, rich marinara sauce, and perfectly cooked linguine, it’s a meal that’s as easy to make as it is delicious.

So, why not give it a try tonight? You’re just five steps away from a fantastic dinner that will impress everyone at the table. Enjoy your shrimp marinara pasta and savor every bite!

Perfect Cream Cheese Cake Filling (No Bake Option!)

When it comes to making cakes and desserts, there’s nothing quite as versatile and decadent as a cream cheese cake filling. Whether you’re preparing a full cake, cupcakes, or even a pie, the right filling can take your dessert from good to irresistible. And the best part? You don’t need to turn on the oven for this one! The perfect no-bake cream cheese cake filling is creamy, tangy, and downright delicious, making it a go-to option for both novice and experienced bakers alike.

In this article, you’ll learn exactly how to make the perfect cream cheese cake filling, with a no-bake option that’s easy to whip up and customize. So, grab your mixing bowls, and let’s dive in!

What is Cream Cheese Cake Filling?

Cream cheese cake filling is a rich, smooth mixture typically made from softened cream cheese, sugar, and a few flavoring ingredients like vanilla or lemon. It’s popular for filling cakes, cheesecakes, and pies due to its creamy texture and slightly tangy flavor. What makes it so beloved is how well it balances sweetness and tang, giving your desserts a perfect, mouthwatering layer.

  • Texture: The creamy and smooth consistency pairs beautifully with a variety of cake textures, especially in no-bake or light desserts.
  • Taste: The tanginess of cream cheese adds a depth of flavor, making it the ideal filling for sweet treats.
  • Versatility: You can easily customize the filling by adding flavors like lemon, vanilla, or even chocolate.

Why Choose a No-Bake Cream Cheese Cake Filling?

While traditional cake fillings often require baking or even chilling, the no-bake option simplifies the process significantly. Here are some reasons why you might choose a no-bake cream cheese cake filling for your next dessert creation:

1. Quick and Easy

With no oven time involved, a no-bake cream cheese filling comes together in just minutes. All you need to do is mix the ingredients, and you’ll have a luscious filling ready to go!

2. Perfect for Warm Weather

When the weather is warm, turning on the oven isn’t always the best option. A no-bake filling allows you to enjoy rich desserts without heating up your kitchen.

3. Great for Beginners

If you’re just starting out with baking, no-bake recipes are the perfect way to build your skills without the complexity of baking a cake from scratch. This recipe is forgiving, easy to follow, and always results in a delicious filling.

4. Energy Efficient

Since you’re not using the oven, you’re saving energy, which is both cost-effective and environmentally friendly.

How to Make Perfect No-Bake Cream Cheese Cake Filling

Now that you know why no-bake cream cheese filling is the way to go, let’s dive into how you can make the perfect version at home. The process is simple, and the result is always mouthwatering!

Ingredients:

  • Cream Cheese (Softened) – 8 oz (1 block): The base of the filling that gives it a rich, creamy texture.
  • Powdered Sugar – 1 cup: For sweetness and smoothness.
  • Vanilla Extract – 1 tsp: Adds that familiar, comforting flavor.
  • Heavy Whipping Cream – 1 cup: To give the filling a fluffy and smooth texture.
  • (Optional) Lemon Juice or Zest – 1 tbsp: Adds a refreshing tang to balance out the sweetness.

Instructions:

  1. Soften the Cream Cheese: Place the cream cheese on the countertop for about 30 minutes before starting. Softening it makes it easier to blend and ensures a smooth filling.
  2. Mix the Base: In a large mixing bowl, beat the softened cream cheese with a hand mixer on medium speed for 1-2 minutes until it’s smooth and free of lumps.
  3. Add the Sugar and Vanilla: Gradually add the powdered sugar and vanilla extract. Continue to beat on medium speed until fully incorporated. You should have a smooth, creamy texture.
  4. Whip the Cream: In a separate bowl, whip the heavy whipping cream until stiff peaks form. This may take 2-3 minutes, so be patient!
  5. Fold the Whipped Cream: Gently fold the whipped cream into the cream cheese mixture. This keeps the filling light and airy.
  6. Chill the Filling: For a thicker consistency, chill the filling in the fridge for about 30 minutes. This will help it firm up and make it easier to spread.

Tip: If you’re looking for a firmer filling, you can refrigerate it longer. However, it will stay soft if served immediately.

Creative Variations to Try with Your Cream Cheese Cake Filling

One of the best things about this no-bake cream cheese cake filling is its versatility. You can customize it with various flavors and ingredients to make it your own. Here are some creative variations:

1. Fruit-Flavored Cream Cheese Filling

Add fruit puree, fresh berries, or citrus zest to your filling for a fruity twist. Try lemon zest, strawberry puree, or even raspberry jam for a burst of flavor.

2. Chocolate Cream Cheese Filling

If you’re a fan of chocolate, you can melt some chocolate chips and fold them into the cream cheese filling. For a rich, decadent chocolate flavor, consider using dark chocolate.

3. Spiced Cream Cheese Filling

Add spices like cinnamon, nutmeg, or pumpkin spice to the filling for a cozy, fall-inspired flavor. This variation is perfect for seasonal desserts!

4. Peanut Butter Cream Cheese Filling

For a nutty and sweet option, stir in some smooth peanut butter to your filling. This pairs wonderfully with chocolate cakes or cupcakes.

How to Use No-Bake Cream Cheese Cake Filling

Now that you’ve made your perfect no-bake cream cheese filling, you might be wondering how to use it. This filling is incredibly versatile and can be used in a variety of desserts.

1. For Cheesecakes

This no-bake filling is ideal for cheesecakes, whether you’re making a traditional cheesecake or a lighter version. Simply spoon the filling onto a pre-baked or no-bake crust and chill until ready to serve.

2. In Cupcakes

Fill your cupcakes with this creamy filling for an added surprise in the center. You can even pipe it into the tops for a beautiful, creamy topping.

3. As a Cake Filling

Layer this delicious filling between cake layers for a rich, creamy texture. It pairs perfectly with chocolate, vanilla, or even carrot cakes.

4. For Pies

This filling works beautifully in a graham cracker crust for a simple, no-bake pie. Add some fruit topping, and you’ve got a fantastic dessert!

5. In Parfaits

For an easy and elegant dessert, layer the cream cheese filling with granola, fresh fruit, or crumbled cookies to make delicious parfaits.

Troubleshooting Common No-Bake Cream Cheese Cake Filling Issues

Even though this recipe is simple, there are a few common issues you might encounter. Here are some troubleshooting tips to ensure your filling turns out perfect every time:

Problem 1: The Filling is Too Runny

  • Solution: Ensure that the cream cheese is fully softened, and the heavy cream is whipped to stiff peaks. If the mixture is still too runny, you can add more powdered sugar or refrigerate it for a while to firm it up.

Problem 2: The Filling is Too Thick

  • Solution: Add a splash of milk or extra heavy cream to thin it out. Start with just a teaspoon and mix it in until you reach the desired consistency.

Problem 3: The Whipped Cream Won’t Hold

  • Solution: Make sure you’re whipping the cream to stiff peaks. If you can’t achieve stiff peaks, try using chilled mixing bowls and beaters, as this can help stabilize the cream.

FAQs About No-Bake Cream Cheese Cake Filling

Q1: Can I use low-fat cream cheese for this recipe?

  • Answer: Yes, you can! Low-fat cream cheese works fine, but it may result in a slightly different texture and less richness.

Q2: How long can I store no-bake cream cheese cake filling?

  • Answer: You can store the filling in an airtight container in the fridge for up to 3 days. Just make sure to cover it tightly to prevent it from drying out.

Q3: Can I freeze no-bake cream cheese cake filling?

  • Answer: Yes, this filling can be frozen for up to a month. When you’re ready to use it, just thaw it overnight in the fridge before using it.

Conclusion

Perfecting a no-bake cream cheese cake filling doesn’t have to be complicated. With just a few simple ingredients and easy steps, you can create a rich, creamy filling that’s perfect for any dessert. Whether you’re looking to fill cakes, cupcakes, pies, or parfaits, this versatile recipe will elevate your desserts and impress your guests. And with endless customization options, you can create a filling that perfectly suits your taste.

So, why not give it a try today? You’ll have a delicious, no-bake cream cheese cake filling in no time, ready to make your next dessert an unforgettable one!

No Title

February 20, 2025

Sara

Cottage Cheese Flatbread Recipes: High-Protein & Delicious

If you’re craving a healthy, protein-packed alternative to traditional bread, cottage cheese flatbread is your answer. This recipe is simple, nutritious, and incredibly versatile. Whether you’re a fitness enthusiast, a busy parent, or someone simply looking to make healthier meals, this cottage cheese flatbread can be the perfect addition to your meal prep. With just a few ingredients, you’ll be able to create a soft, fluffy flatbread that’s full of protein and low in carbs—ideal for anyone looking to improve their diet without compromising on flavor.

In this article, we’ll walk you through a step-by-step guide on how to make cottage cheese flatbread. Plus, we’ll explore various ways to enjoy it, its health benefits, and offer some tips for storage and meal prep. Let’s dive in!

Why You’ll Love This Cottage Cheese Flatbread

Cottage cheese flatbread is not just another recipe; it’s a game-changer for anyone who wants a quick, healthy meal. Here’s why you’ll love it:

  • High in Protein: Cottage cheese is packed with protein, which is essential for muscle repair, keeping you full, and supporting overall health.
  • Low in Carbs: Unlike regular bread, which is loaded with refined carbs, cottage cheese flatbread offers a low-carb alternative, making it a great choice for those on keto or low-carb diets.
  • Quick and Easy to Make: There’s no need to wait for dough to rise or deal with complicated kneading. This recipe is ready in under 30 minutes!
  • Versatile: Whether you’re looking for a snack, side dish, or a healthy wrap, this flatbread works for every occasion.

By the end of this article, you’ll understand why this flatbread recipe should become a staple in your kitchen.


Cottage Cheese Flatbread Ingredients & Substitutions

Before you get started, let’s take a look at the ingredients you’ll need. You might already have most of these in your pantry, which makes this recipe even more convenient.

IngredientPurposeSubstitutions
Cottage CheeseAdds protein, moisture, and richnessGreek yogurt, ricotta
Egg WhitesProvides structure and lightnessWhole eggs (for a richer taste)
FlourForms the dough structureAlmond flour (for gluten-free)
Baking PowderHelps the bread riseBaking soda and vinegar mix
Salt & SeasoningsEnhances flavorGarlic powder, onion powder, dried herbs

If you’re looking for a gluten-free version, simply swap out the regular flour for almond or oat flour. Similarly, if you want a dairy-free option, try using Greek yogurt or ricotta as a substitute for cottage cheese. The beauty of this recipe lies in its flexibility—you can make it your own!


How to Make Cottage Cheese Flatbread (Step-by-Step Guide)

Now that you’ve gathered all your ingredients, it’s time to roll up your sleeves and get cooking. Making cottage cheese flatbread is surprisingly simple, and the result is incredibly rewarding. Here’s how you do it:

Step 1 – Prep the Ingredients

  • Preheat your skillet or oven: If you’re using a skillet, heat it over medium-high heat. If you prefer baking, preheat your oven to 375°F (190°C).
  • Blend the cottage cheese: For an ultra-smooth texture, blend the cottage cheese in a food processor or blender for a few seconds. This step will make the flatbread lighter and fluffier.
  • Whisk the egg whites: Lightly whisk the egg whites until they become slightly foamy. This helps incorporate air into the dough, making it soft and fluffy.

Step 2 – Mix the Dough

  • Combine the dry ingredients: In a large bowl, combine the flour, baking powder, and salt. Mix them well.
  • Add the wet ingredients: Slowly add the cottage cheese and egg whites to the dry mixture. Stir until the dough forms. The dough should be soft but not sticky.
  • Optional add-ins: If you like extra flavor, feel free to add garlic powder, herbs, or other seasonings to the dough.

Step 3 – Shape & Cook

  • Shape the dough: Divide the dough into small portions (about the size of a golf ball). Roll each portion into a ball and flatten it with your hands or a rolling pin to form a round flatbread.
  • Cook the flatbread: If you’re using a skillet, cook each flatbread for 2-3 minutes per side, or until golden brown and cooked through. If baking, place the flatbreads on a parchment-lined baking sheet and bake for 10-12 minutes, flipping halfway through.

Once your flatbread is ready, allow it to cool for a few minutes before serving.


Cottage Cheese Flatbread Nutrition & Health Benefits

Cottage cheese flatbread is not only delicious, but it’s also packed with nutrients that will benefit your health. Here are some of the key health benefits:

High in Protein

Cottage cheese is an excellent source of protein, which is essential for muscle repair, immune function, and overall health. A serving of cottage cheese flatbread can provide around 10-15 grams of protein, depending on the portion size.

Low in Carbs

For those following low-carb or ketogenic diets, this flatbread is a perfect alternative to traditional bread. The main ingredients—cottage cheese, egg whites, and flour (or almond flour)—keep the carb count low while still providing a satisfying and filling meal.

Rich in Calcium & Probiotics

Cottage cheese is a great source of calcium, which supports bone health, and probiotics, which help maintain a healthy gut. By incorporating this flatbread into your meals, you’re also supporting your digestive health.


Tasty Ways to Enjoy Cottage Cheese Flatbread

Now that you’ve got your flatbread, you might be wondering how to enjoy it. There are so many delicious ways to incorporate this high-protein flatbread into your meals. Here are some ideas to get you started:

As a Breakfast Option

  • Top with avocado and eggs: The creamy avocado and protein-packed eggs are the perfect pairing for this flatbread. Add a sprinkle of salt and pepper, and you’ve got a filling, nutritious breakfast.
  • Spread with peanut butter and honey: For a sweeter twist, spread a thin layer of peanut butter on your flatbread and drizzle with honey. It’s a simple, satisfying breakfast that fuels your day.

For Lunch or Dinner

  • Use as a sandwich wrap: Replace traditional bread with this flatbread for a low-carb sandwich. Fill it with lean protein (chicken, turkey, or tofu), fresh veggies, and your favorite sauce or dressing.
  • Serve with soups or dips: Enjoy your flatbread with a bowl of hearty soup or as a side to hummus, guacamole, or tzatziki.

As a Healthy Snack

  • Mini pizzas: Spread your favorite tomato sauce on the flatbread, top with cheese and veggies, and bake for a quick and healthy mini pizza.
  • Pair with hummus: Cut your flatbread into wedges and dip them in homemade hummus for a satisfying and nutritious snack.

Storage & Meal Prep Tips

If you’re making multiple batches of cottage cheese flatbread for the week, here are a few tips to store them properly and keep them fresh:

Refrigeration

Cottage cheese flatbread can be stored in the fridge for up to 3 days. Simply place the flatbreads in an airtight container to prevent them from drying out. Reheat them in a skillet or toaster for the best texture.

Freezing

If you want to keep your flatbread for longer, freeze it! Wrap each flatbread individually in plastic wrap or parchment paper and place them in a freezer-safe bag. They will stay fresh in the freezer for up to 2 months.

Reheating

To reheat your flatbread, place it in a toaster or heat it in a skillet for a minute or two on each side. This will restore the crispness and flavor, making it just as delicious as when it was freshly made.


FAQ – Cottage Cheese Flatbread Recipes

Can I make cottage cheese flatbread gluten-free?

Yes! You can easily make this flatbread gluten-free by using almond flour or oat flour instead of regular flour. Both are great alternatives that will give you the same soft texture.

What does cottage cheese do in flatbread?

Cottage cheese adds moisture, protein, and a slight tangy flavor to the flatbread, making it soft and tender. It also helps bind the dough together, eliminating the need for yeast or extensive kneading.

Can I use whole eggs instead of egg whites?

Absolutely! If you prefer the richness of whole eggs, feel free to substitute them for the egg whites. Whole eggs will make the bread a bit richer and slightly denser, but it will still be delicious.

How do I make this flatbread crispy?

To get a crispier texture, cook the flatbread on medium-high heat and use a small amount of oil in the pan. Alternatively, you can bake it in the oven at a higher temperature for a crispy crust.


Conclusion

Cottage cheese flatbread is a fantastic way to enjoy a high-protein, low-carb meal that doesn’t compromise on taste. It’s easy to make, customizable, and can be enjoyed in a variety of ways. Whether you’re using it for breakfast, lunch, dinner, or as a snack, this flatbread is sure to become a favorite in your kitchen. So why wait? Try this recipe today, and let us know how you like to enjoy your cottage cheese flatbread!

Ready to get started? Grab your ingredients and make your first batch today!

No Title

February 20, 2025

Sara

Cream Wheat Oatmeal: Best Tips for a Creamy Bowl You’ll Love


Introduction: The Comfort of Creamy Oatmeal

Picture this: You wake up on a chilly morning and the first thing you crave is a warm, comforting breakfast. There’s something about the richness of a creamy bowl of cream wheat oatmeal that hits the spot, doesn’t it? Whether it’s the nostalgic memories of childhood breakfasts or just the feeling of a cozy, satisfying meal, this simple dish is a comforting staple that many of us rely on.

But there’s a catch—getting that perfect creamy texture isn’t always as easy as it sounds. You may have found yourself with clumpy, watery, or dry oatmeal before, wondering how to turn it into the luscious bowl of goodness you imagine. Don’t worry, though. You’re not alone. With just a few tips and tricks, you can easily master the art of making cream wheat oatmeal that’s smooth, creamy, and absolutely delicious every single time.

So, if you’re ready to level up your oatmeal game and create the perfect creamy bowl, keep reading for some foolproof tips and the best recipe that’ll have you enjoying your morning meal like never before.


What is Cream Wheat Oatmeal? Understanding the Basics

Before diving into the tips and recipe, let’s quickly go over what cream wheat oatmeal is. While it may seem like just another form of breakfast porridge, cream wheat oatmeal (often referred to as “cream of wheat”) is made from finely ground wheat, which gives it a smoother, creamier texture compared to traditional oatmeal made from oats.

Cream Wheat vs. Oatmeal:

  • Cream Wheat Oatmeal: This oatmeal is made from wheat germ, a finer texture, and cooks quickly to create a smooth, creamy consistency. It’s more commonly used in some regions as a breakfast cereal.
  • Traditional Oatmeal: Made from oats (either rolled, steel-cut, or instant), oatmeal tends to have a more chewy texture and can be thicker, depending on the cooking method.

Both offer great health benefits, like fiber, iron, and other essential nutrients, but cream wheat oatmeal tends to feel a bit more velvety on the palate.

What You Need:

  • Ingredients: Cream of wheat, milk (or a milk alternative), sweeteners (like sugar, honey, or maple syrup), and flavorings (spices, fruits, or nuts).
  • Essential Tools: You don’t need much—just a saucepan, stirring spoon, measuring cups, and maybe a bowl for serving.

Once you’ve got everything together, the fun part begins!


Tips for Making the Creamiest Cream Wheat Oatmeal

Making the perfect bowl of cream wheat oatmeal is all about the right techniques. It’s the small details that can transform a run-of-the-mill breakfast into a rich, creamy bowl you’ll crave every morning. Here are some tried-and-true tips to ensure your oatmeal comes out perfect every time:

1. Use Milk (or Milk Alternatives) Instead of Water

If you want that ultra-creamy texture, skip the water and go for milk—whether it’s dairy milk, almond milk, oat milk, or coconut milk. Milk adds richness and helps achieve that smooth, silky texture that makes cream wheat oatmeal so comforting. If you prefer a dairy-free option, go for something like almond milk for a lighter taste, or coconut milk for a creamy, tropical twist.

2. Cook on Low Heat for a Slow Simmer

Cooking on low heat is essential. The longer you cook cream wheat oatmeal over low heat, the creamier it becomes. Cooking it on high heat might cause it to cook too fast, which could result in a lumpy or watery consistency. Slow cooking allows the milk to fully absorb into the cream wheat, resulting in a smooth, velvety texture.

3. Stir Frequently for the Best Consistency

Stirring your cream wheat oatmeal is key to preventing clumps and ensuring even cooking. Stirring constantly helps to break up any potential lumps and promotes an even consistency. If you leave it unattended for too long, you risk having some parts of your oatmeal burn while others stay too watery. Give it a few gentle stirs every couple of minutes to keep it perfect.

4. Add a Pinch of Salt to Enhance Flavor

It might seem counterintuitive, but a small pinch of salt can really bring out the flavors in your cream wheat oatmeal. Salt helps balance the sweetness and adds a savory depth that makes the dish more satisfying. Don’t worry—you won’t taste it, but it will make a big difference in elevating the overall flavor.

5. Finish with Butter or Cream for Extra Richness

If you’re craving a really luxurious bowl of cream wheat oatmeal, don’t skip the final step of adding butter or a splash of cream once it’s off the stove. This step ensures your oatmeal is rich, velvety, and indulgent, taking your breakfast from good to great. You can also use plant-based butter if you prefer a dairy-free version.


Flavoring Your Cream Wheat Oatmeal: Creative Ideas

Now that you know the secrets to getting a creamy, smooth base, let’s talk about flavor! The beauty of cream wheat oatmeal is how easily you can customize it. Whether you prefer it sweet, savory, or somewhere in between, there are endless ways to elevate the taste.

Sweet Flavorings:

  • Brown Sugar or Honey: For that classic sweet taste, brown sugar or honey are perfect choices. Honey adds a bit of floral sweetness, while brown sugar deepens the flavor.
  • Fresh Fruits: Top your oatmeal with sliced bananas, berries, or even apples for a fresh burst of sweetness. If you’re feeling adventurous, you could also try roasted fruits like pears or peaches.
  • Spices and Extracts: Cinnamon, nutmeg, or vanilla extract are classic spices that add warmth and depth. You can even mix in some ginger or cardamom for a unique twist.

Savory Flavorings:

  • Cheese and Herbs: For a savory oatmeal, top your cream wheat with shredded cheese (cheddar, parmesan, or goat cheese) and a sprinkle of fresh herbs like thyme or rosemary.
  • Sautéed Vegetables: Adding sautéed spinach, mushrooms, or even some roasted garlic gives your oatmeal a savory depth.
  • Olive Oil or Avocado: Drizzling some olive oil or topping your oatmeal with sliced avocado adds healthy fats and a creamy texture, making it feel even more indulgent.

Crunchy Additions:

  • Nuts and Seeds: Adding a handful of nuts or seeds—like almonds, walnuts, or chia seeds—gives your oatmeal some crunch and extra protein.
  • Granola or Coconut: For a different texture, sprinkle granola or shredded coconut on top.

Recipe for Cream Wheat Oatmeal: A Step-by-Step Guide

Now that you know the tips and tricks, here’s a simple and delicious cream wheat oatmeal recipe that you can try right away. Follow these steps for a creamy, satisfying bowl of oatmeal that’s sure to impress!

IngredientsAmount
Cream of wheat1 cup
Milk (or milk alternative)2 cups
Sweetener (sugar, honey)1-2 tbsp
SaltPinch
Butter or cream (optional)1 tbsp
Toppings (fruits, nuts)To taste

Prep Time – 5 minutes

Cook Time – 10 minutes

Total Time – 15 minutes

Instructions:

  1. In a saucepan, combine the cream of wheat and milk.
  2. Bring to a simmer over medium heat, stirring frequently.
  3. Add your sweetener, salt, and any flavorings (spices, fruits, etc.).
  4. Continue cooking for 5-7 minutes until the oatmeal thickens to your desired consistency.
  5. Once removed from heat, stir in butter or cream for extra richness, and top with your favorite toppings.

How to Customize Your Cream Wheat Oatmeal

Want to make your oatmeal even better? Here are a few customization ideas to suit your taste:

  • Vegan or Dairy-Free: Use almond milk, oat milk, or coconut milk for a creamy vegan-friendly bowl.
  • Protein Boost: Stir in protein powder, nut butter, or a dollop of Greek yogurt for a protein-packed breakfast.
  • Fiber Boost: Add chia seeds, flaxseeds, or a handful of berries for extra fiber.
  • Gluten-Free: Make sure you’re using certified gluten-free cream of wheat to accommodate gluten sensitivities.

Common Mistakes to Avoid When Making Cream Wheat Oatmeal

Even the best recipes can go awry if you make a mistake. Here are some common errors to watch out for:

  • Cooking on High Heat: High heat can cause your oatmeal to burn, leading to a lumpy texture. Always cook on low to medium heat for a smooth consistency.
  • Not Stirring Enough: Stirring ensures even cooking and prevents clumps. Don’t neglect this step.
  • Using Too Much Water: Too much liquid can result in runny oatmeal. Stick to the recommended ratio of milk and cream wheat.
  • Overcooking: Cooking it for too long will make your oatmeal too thick and sticky. Once it’s thickened to your liking, take it off the heat.

Conclusion: Enjoy a Creamy Bowl of Comfort Every Morning

There you have it! Making the perfect cream wheat oatmeal is simpler than you think, and with these tips, you can ensure that your mornings start with a rich, creamy, and satisfying breakfast. Whether you’re in the mood for something sweet, savory, or creative, cream wheat oatmeal is a versatile dish that’s easy to customize. So, why not give it a try tomorrow morning? Your perfect, creamy bowl awaits!

No Title

February 20, 2025

Sara

Easy Snickerdoodles Without Cream of Tartar (So Soft!)

The Secret to Soft, Chewy Snickerdoodles—No Cream of Tartar Needed!

There’s something undeniably comforting about biting into a warm, cinnamon-sugar-coated snickerdoodle. But what if you’re halfway through your recipe and realize you don’t have cream of tartar? Or maybe you’re wondering if you even need it? Good news—you don’t! This easy snickerdoodle recipe skips the cream of tartar while still delivering the soft, chewy texture and signature flavor you love.

In this guide, you’ll learn exactly how to make snickerdoodles without cream of tartar, the best substitutes, and pro tips for perfect cookies every time. Let’s get baking!


🕒 Quick Recipe Overview

Prep TimeCook TimeTotal TimeServings
10 minutes10 minutes20 minutes24 cookies

Why Make Snickerdoodles Without Cream of Tartar?

Do You Really Need Cream of Tartar for Snickerdoodles?

Cream of tartar is a classic ingredient in snickerdoodles, responsible for their slight tang and chewy texture. However, if you don’t have it on hand, you can still make delicious cookies with simple swaps.

Why skip cream of tartar?

  • You don’t have it in your pantry.
  • You prefer a milder flavor without the tanginess.
  • You want to use a common alternative that works just as well.

The Best Substitutes for Cream of Tartar in Snickerdoodles

If you’re wondering how to replace cream of tartar, here are the best options:

  • Baking Powder – The best 1:1 substitute. It already contains cream of tartar and baking soda, making it a perfect swap.
  • Lemon Juice or Vinegar – Adds acidity but can slightly alter the flavor.
  • Buttermilk or Yogurt – Works well for moisture and tenderness.

For this recipe, we’ll use baking powder, which keeps the cookies light, chewy, and foolproof.


🍪 Ingredients You’ll Need

IngredientAmount
All-purpose flour2 ¾ cups
Baking powder1 ½ tsp
Salt½ tsp
Unsalted butter1 cup
Granulated sugar1 ½ cups
Eggs2
Vanilla extract2 tsp
Cinnamon2 tsp

Ingredient Notes & Substitutions

  • Butter – Unsalted is best; if using salted, reduce added salt.
  • Sugar – White sugar works best for traditional snickerdoodles.
  • Eggs & Vanilla – Essential for structure and flavor.
  • Cinnamon – Adds the signature warm spice.

👩‍🍳 Step-by-Step Instructions

How to Make Snickerdoodles Without Cream of Tartar

1️⃣ Preheat & Prep:

  • Preheat your oven to 375°F (190°C).
  • Line baking sheets with parchment paper.

2️⃣ Mix Dry Ingredients:

  • In a medium bowl, whisk together flour, baking powder, salt, and cinnamon.

3️⃣ Cream Butter & Sugar:

  • In a large bowl, beat butter and sugar with a mixer until light and fluffy (about 2 minutes).
  • Add eggs and vanilla extract, mixing until well combined.

4️⃣ Combine & Roll:

  • Gradually add dry ingredients to wet ingredients, mixing until just combined.
  • Roll dough into 1-inch balls and coat them in cinnamon-sugar.

5️⃣ Bake & Enjoy:

  • Place on baking sheets and bake for 10 minutes.
  • Let cool on the pan for 5 minutes before transferring to a wire rack.

💡 Tips for Soft & Chewy Snickerdoodles

  • Don’t overbake! Cookies will firm up as they cool.
  • Chill the dough for 30 minutes to enhance texture.
  • Use fresh baking powder to ensure a proper rise.

❓ FAQ – Snickerdoodles Without Cream of Tartar

Can I make snickerdoodles without baking powder or cream of tartar?

Yes! You can use self-rising flour or another leavening substitute.

Will my cookies taste different without cream of tartar?

Slightly! They’ll still be soft and chewy, just without the tangy note.

Can I freeze snickerdoodle dough?

Yes! Freeze in balls and bake straight from the freezer, adding 1-2 minutes to the bake time.


👋 Conclusion: Try These Easy Snickerdoodles Today!

Now that you know how to make soft, chewy snickerdoodles without cream of tartar, it’s time to put your baking skills to the test! These cookies are easy, quick, and just as delicious as the classic version.

So what are you waiting for? Bake a batch today and enjoy the perfect cinnamon-sugar treat! 🍪✨

No Title

February 20, 2025

Sara

How to Make Ice Cream with a KitchenAid Mixer: Easy Ice Cream Recipe for Every Home

Imagine enjoying a rich, creamy bowl of homemade ice cream, fresh from your kitchen, crafted with your very own hands using a KitchenAid mixer. No more heading to the store to pick up your favorite flavor—now you can make it yourself! If you’ve ever wondered how to make ice cream with a KitchenAid mixer, you’ve come to the right place. In this step-by-step guide, we’ll walk you through how to create delicious ice cream at home, using your KitchenAid mixer and its Ice Cream Maker Attachment. Whether you’re a seasoned pro or a beginner, you’ll find this easy-to-follow recipe to be the key to homemade, customizable ice cream.

What You Need to Make Ice Cream with a KitchenAid Mixer

Before we dive into the recipe, let’s go over the essentials. You’ll need a few ingredients, a KitchenAid mixer, and the right attachment to get started. Here’s what you’ll need to make the perfect batch of homemade ice cream.

Essential Ingredients for Your Ice Cream Recipe KitchenAid

Making ice cream at home is surprisingly simple, and it all starts with just a few basic ingredients. Here are the essentials:

  • Heavy Cream: This is the base for your ice cream, giving it that rich, creamy texture.
  • Whole Milk: Adding milk ensures your ice cream isn’t too thick or too runny.
  • Sugar: A bit of sweetness is needed to balance the richness of the cream.
  • Vanilla Extract: Pure vanilla extract gives your ice cream that traditional, comforting flavor.
  • Eggs (optional): Some ice cream recipes include eggs for a custard-based treat that’s extra creamy.
  • Salt: A pinch of salt helps bring out the natural sweetness of your ice cream.

Optional Ingredients: You can get creative with flavor add-ins and mix-ins such as:

  • Chocolate Chips
  • Crushed Nuts
  • Fruit (berries, mango, etc.)
  • Cocoa Powder for a chocolate twist

These ingredients will form the backbone of your ice cream. But the real fun begins when you start adding your unique flavor combinations!

KitchenAid Mixer Attachments and Tools

To make ice cream with your KitchenAid mixer, you’ll need the KitchenAid Ice Cream Maker Attachment. This attachment is designed specifically for making ice cream in a KitchenAid mixer and makes the whole process quick and easy. Here’s a breakdown of the components:

  • Ice Cream Maker Attachment: This attachment comes with a dasher, a freezing bowl, and a drive assembly that fits onto your KitchenAid mixer.
  • Freezer Bowl: The freezing bowl must be kept in the freezer for at least 24 hours before you use it to churn your ice cream. This is essential to achieving that perfect creamy texture.
  • Mixer: Your KitchenAid stand mixer will provide the motor and support to churn the ice cream.

Step-by-Step Guide to Making Ice Cream with Your KitchenAid Mixer

Now that you have your ingredients and equipment ready, it’s time to make your ice cream! Here’s how you can do it:

Step 1: Prepare Your Ice Cream Mixture

Making ice cream starts with preparing your mixture. You’ll combine the cream, milk, sugar, and any additional ingredients in a bowl. If you’re making a custard-based ice cream, you’ll need to temper the eggs first to avoid scrambling them. Here’s a quick breakdown:

  1. Combine the Milk, Cream, and Sugar: In a large mixing bowl, whisk together the heavy cream, whole milk, and sugar. Stir until the sugar is fully dissolved.
  2. Add Vanilla Extract (or other flavorings): Stir in the vanilla extract or your choice of flavorings (like cocoa powder, mint extract, or fruit puree).
  3. For Custard Ice Cream: If you prefer a richer, custard-style ice cream, whisk the eggs separately in a bowl. Gradually pour some of the warm cream mixture into the eggs, then slowly combine everything. Heat the mixture on low to thicken, but avoid boiling.

Once your ice cream mixture is ready, it’s time to move on to the churning process.

Step 2: Attach the Ice Cream Maker Attachment

This is where the KitchenAid mixer really shines. Attach the Ice Cream Maker Attachment to your mixer, ensuring the freezing bowl has been in the freezer for at least 24 hours. Follow these steps:

  1. Place the frozen bowl on the mixer stand and attach the dasher (the paddle-like part that stirs the ice cream).
  2. Secure the drive assembly to your KitchenAid mixer.
  3. Turn on your mixer to the lowest speed setting.

Now you’re ready for the fun part!

Step 3: Churn Your Ice Cream

Pour the prepared ice cream mixture into the freezing bowl. With the mixer running on the lowest setting, the dasher will churn the mixture while the frozen bowl cools it down.

  • Churning Time: This process typically takes about 20-25 minutes. The ice cream will thicken as it churns.
  • Consistency: If you like your ice cream soft-serve style, you can stop churning when it reaches your desired consistency. For firmer ice cream, let it churn a little longer.

Tip: If your ice cream is still too soft, you can transfer it to a container and freeze it for 2-3 hours to firm it up.

Step 4: Freeze Your Ice Cream

Once your ice cream has reached the desired consistency, transfer it from the freezing bowl into an airtight container. Smooth it out with a spatula and cover it tightly.

  • Freeze Time: Let the ice cream freeze for at least 3-4 hours for the best texture.
  • Storage: You can store your homemade ice cream in the freezer for up to a week (if it lasts that long!).

Common Ice Cream Recipe Variations for KitchenAid Mixers

The great thing about making ice cream with a KitchenAid mixer is how customizable it is. Here are a few easy recipe variations to try:

Vanilla Ice Cream Recipe with KitchenAid Mixer

This classic vanilla ice cream is the perfect starting point for your homemade ice cream journey. It’s rich, creamy, and incredibly easy to make.

  • Ingredients: Heavy cream, whole milk, sugar, vanilla extract.
  • Instructions: Follow the steps outlined earlier to prepare your vanilla ice cream mixture, churn it, and freeze.

Chocolate Ice Cream Recipe with KitchenAid Mixer

For all the chocolate lovers out there, this variation will be a hit. Using either cocoa powder or melted chocolate, you can create a deep, rich chocolate flavor.

  • Ingredients: Heavy cream, whole milk, sugar, cocoa powder (or melted chocolate), vanilla extract.
  • Instructions: Follow the same steps as the vanilla recipe but add cocoa powder or melted chocolate to the mixture.

Dairy-Free Ice Cream Recipe with KitchenAid

If you’re dairy-free or lactose intolerant, no worries! You can still enjoy the joys of homemade ice cream. Use coconut milk, almond milk, or oat milk instead of dairy products.

  • Ingredients: Coconut milk (or almond milk), sugar, vanilla extract, salt.
  • Instructions: Substitute coconut milk or another dairy-free alternative for the cream and milk in the original recipe. Follow the same steps.

Helpful Tips and Troubleshooting for Making Ice Cream with a KitchenAid Mixer

Here are a few tips to ensure your homemade ice cream turns out perfectly:

Tips for Perfect Ice Cream Every Time

  • Chill the Ice Cream Maker: The freezing bowl must be frozen for at least 24 hours before use. This step is crucial for the proper texture of the ice cream.
  • Use Cold Ingredients: If your ingredients are cold when you start, your ice cream will churn faster and have a smoother consistency.
  • Don’t Over-Churn: Churning for too long can cause the ice cream to turn icy. Keep an eye on the texture!

Troubleshooting Common Ice Cream Problems

  • Soft Ice Cream: If your ice cream is too soft, place it in the freezer for a couple of hours after churning.
  • Hard Ice Cream: If your ice cream turns out too hard after freezing, let it sit at room temperature for a few minutes before scooping.

Conclusion: The Joy of Homemade Ice Cream

Making ice cream with your KitchenAid mixer is a simple and fun way to treat yourself, your family, and your friends. With a few ingredients and the right attachment, you can create endless flavors that are better than anything you’d buy at the store. Whether it’s a hot summer day or a cozy winter evening, homemade ice cream is a sweet treat that’s always worth the effort.

Ready to try making your own ice cream? Grab your KitchenAid mixer, freeze that bowl, and start churning your way to the best homemade ice cream you’ve ever had.

FAQs About Making Ice Cream with a KitchenAid Mixer

Can you make ice cream without the KitchenAid Ice Cream Attachment?

Yes, it’s possible to make ice cream without the attachment, but it requires more effort and may not result in the same creamy consistency. The KitchenAid attachment makes the process quicker and easier.

How long does it take to make ice cream with a KitchenAid mixer?

The churning process typically takes about 20-25 minutes. After that, you’ll need to freeze the ice cream for a few hours to firm it up.

What’s the best consistency for homemade ice cream?

For soft-serve ice cream, churn for a shorter time. If you prefer firmer ice cream, let it churn for longer, and then freeze it for a few hours.


Making ice cream with your KitchenAid mixer is not only fun but also a rewarding experience. By following these easy steps, you’ll be able to whip up batches of delicious homemade ice cream in no time. So, what are you waiting for? Get your KitchenAid mixer out, and start creating!

No Title

February 20, 2025

Sara

How to Make Soft & Fluffy Cuban Bread at Home

Introduction: The Magic of Homemade Cuban Bread

There’s something truly special about the smell of fresh bread baking in your kitchen. It’s warm, inviting, and comforting, like a hug in food form. If you’ve ever had authentic Cuban bread, you know its distinctive, slightly crispy crust and incredibly soft, airy interior make it irresistible.

But here’s the good news—you don’t have to visit a Cuban bakery to enjoy it. With the right ingredients and technique, you can make soft and fluffy Cuban bread right in your own kitchen. Whether you’re making a classic Cuban sandwich or simply enjoying a slice with butter, this guide will walk you through every step of the process.


What Makes Cuban Bread Unique?

Light, Airy, and Fluffy Texture

Cuban bread is different from other breads due to its high hydration level and the use of lard or shortening, which contributes to its signature texture. The result? A bread that’s crispy on the outside and pillowy soft on the inside.

A Staple in Cuban Cuisine

This bread has a rich history, originating in Tampa, Florida, where Cuban immigrants perfected it. It’s traditionally used in Cuban sandwiches, served with café con leche, or eaten on its own with butter.

Why Bake It at Home?

  • Freshness – Nothing beats homemade bread straight from the oven.
  • Customization – Adjust the recipe to your liking.
  • Cost-Effective – Making it yourself saves money over buying from a bakery.

Ingredients & Equipment Needed

Essential Ingredients (Use a Table for Readability)

IngredientQuantityNotes
Bread flour4 cupsHigh-protein for better structure
Warm water1 ½ cupsActivates yeast
Active dry yeast1 packetHelps dough rise
Sugar2 tbspFeeds yeast
Salt1 tbspEnhances flavor
Shortening2 tbspAdds tenderness

Kitchen Tools You’ll Need

  • Large mixing bowl or stand mixer
  • Measuring cups and spoons
  • Dough scraper
  • Baking stone or sheet pan
  • Sharp knife for scoring

Step-by-Step Guide to Making Soft & Fluffy Cuban Bread

Step 1 – Activate the Yeast

  • In a bowl, mix warm water, sugar, and yeast.
  • Let it sit for 5–10 minutes until foamy.

Step 2 – Mix & Knead the Dough

  • In a large mixing bowl, combine flour, salt, and shortening.
  • Slowly add the yeast mixture, stirring until a dough forms.
  • Knead for 8–10 minutes until smooth and elastic.

Step 3 – First Rise (Proofing the Dough)

  • Place the dough in a lightly greased bowl, cover, and let it rise in a warm spot for 1–2 hours or until doubled in size.

Step 4 – Shaping & Second Rise

  • Punch down the dough and shape it into a long, oval loaf.
  • Let it rest on a baking sheet for another 30 minutes.

Step 5 – Scoring & Baking

  • Preheat the oven to 375°F (190°C).
  • Use a sharp knife to make a long slash across the top of the loaf.
  • Bake for 25–30 minutes until golden brown and hollow-sounding when tapped.

Tips for the Softest & Fluffiest Cuban Bread

  • Use Bread Flour: Higher protein content helps with structure.
  • Don’t Rush the Rise: Longer proofing allows better texture.
  • Use Steam for a Crispy Crust: Place a pan of water in the oven while baking.

Storage & Serving Suggestions

How to Keep It Fresh

  • Store at room temperature in a paper bag for up to 3 days.
  • Avoid plastic bags—they trap moisture and make the bread soggy.

Freezing Tips

  • Slice before freezing for easy use.
  • Wrap tightly in plastic and store for up to 2 months.

Best Ways to Enjoy It

  • Cuban Sandwiches – The ultimate use for this bread.
  • Breakfast Toast – Serve with butter and honey.
  • Soup Sidekick – Perfect for dipping into stews and soups.

FAQs About Making Cuban Bread

Why didn’t my Cuban bread rise properly?

  • Your yeast might be expired.
  • The proofing area could be too cold.
  • Over-kneading or under-kneading can affect texture.

Can I use all-purpose flour instead of bread flour?

  • Yes, but the texture will be slightly denser.

How do I get a crispy crust like traditional Cuban bakeries?

  • Bake with a small pan of hot water in the oven for added steam.

Conclusion

Now that you know how to make soft and fluffy Cuban bread, it’s time to put your skills to the test. There’s no greater reward than pulling a warm loaf from the oven and enjoying it fresh. Whether you’re making a Cuban sandwich or simply savoring a slice with coffee, this bread will bring authentic flavor to your kitchen.

Give it a try and share your experience! Have any questions? Drop them in the comments below. Happy baking!

No Title

February 20, 2025

Sara

There’s something magical about baking cookies from scratch. The familiar smell that fills your kitchen, the soft, chewy texture, and of course, the joy of indulging in a warm cookie right out of the oven. But if you’re looking to cut down on butter or you’re simply trying to reduce fat in your diet, you might wonder if it’s possible to enjoy that classic cookie experience without butter. The answer? Absolutely!

In this article, we’ll guide you through five easy no butter cookie recipes that are just as delicious as their buttery counterparts. Whether you’re trying to reduce fat, follow a dairy-free diet, or simply experiment with new ingredients, these recipes are perfect for you. So, grab your apron, and let’s get baking!


Why Choose No Butter Cookies?

Before we jump into the recipes, you might be wondering: Why should you even consider no butter cookies? Let’s take a quick look at the benefits:

  1. Healthier Alternatives: Butter is high in saturated fat, and while it tastes delicious, it’s not the healthiest fat to include in your diet. By swapping out butter for healthier alternatives like oil, applesauce, or even nut butter, you can create cookies that are lower in fat and calories without sacrificing flavor.
  2. Perfect for Special Diets: If you’re vegan, lactose intolerant, or following a dairy-free lifestyle, no butter cookies are a great option. These cookies can easily be made dairy-free by choosing the right substitutes for butter, making them suitable for a variety of dietary preferences.
  3. Versatile and Delicious: You may think that a cookie without butter would be bland or dry, but that’s simply not true! With the right substitutes, no butter cookies can be just as flavorful and satisfying as their buttery counterparts. You can use oils, applesauce, or nut butters to add richness and moisture to your cookies.

Now that you know why no butter cookies are worth trying, let’s explore the ingredients that will help you achieve the perfect cookie.


Key Ingredients for No Butter Cookies

To make the best no butter cookies, you’ll need to understand the key substitutes and how they impact the flavor and texture. Here are the most common ingredients you’ll use:

  • Oil: Oil is one of the most popular butter substitutes in cookie recipes. Vegetable oil, coconut oil, and olive oil can all work well, depending on the flavor you want to achieve. For a neutral taste, vegetable oil is a safe bet, while coconut oil will add a subtle coconut flavor, and olive oil brings an earthy richness to cookies.
  • Applesauce: Unsweetened applesauce is another great butter alternative. It adds moisture to the dough, resulting in a soft, cake-like texture. If you’re looking for a healthier, lower-fat option, applesauce can be a great choice.
  • Yogurt: Plain yogurt, particularly Greek yogurt, is a fantastic substitute for butter. It’s creamy and adds moisture to cookies while also providing a slight tangy flavor. Yogurt also helps keep the cookies soft and chewy.
  • Nut Butters: Peanut butter, almond butter, and other nut butters are not only delicious but also add a creamy texture to cookies. Nut butters work particularly well in chocolate chip or oatmeal cookies, providing extra richness and flavor.

Now that you’re familiar with the essential ingredients, let’s dive into the five easy no butter cookie recipes you’ll love!


1. Classic No Butter Chocolate Chip Cookies

Who doesn’t love a warm, gooey chocolate chip cookie? This no butter version uses oil and a touch of vanilla to maintain the classic flavor you crave, with a healthier twist.

Ingredients:

  • 1 ¾ cups all-purpose flour
  • ¾ cup sugar (white or brown)
  • ½ cup vegetable oil (or coconut oil)
  • 1 tsp vanilla extract
  • 1 tsp baking soda
  • ¼ tsp salt
  • 1 cup chocolate chips

Prep Time: 10 minutes
Cook Time: 12 minutes
Total Time: 22 minutes

Instructions:

  1. Preheat the oven to 350°F (175°C).
  2. In a large bowl, whisk together the flour, sugar, baking soda, and salt.
  3. Add the oil and vanilla extract, mixing until combined.
  4. Fold in the chocolate chips.
  5. Drop spoonfuls of dough onto a baking sheet lined with parchment paper.
  6. Bake for 10-12 minutes, or until the edges are golden brown.
  7. Let cool for a few minutes before enjoying!

2. No Butter Sugar Cookies

If you’re a fan of soft, slightly crisp sugar cookies, this recipe is perfect for you. Using oil as a substitute for butter, these sugar cookies are light, fluffy, and ready to be enjoyed in no time.

Ingredients:

  • 2 ½ cups all-purpose flour
  • 1 cup sugar
  • ½ cup oil (vegetable or coconut oil)
  • 1 tsp baking powder
  • ¼ tsp salt
  • 1 tsp vanilla extract

Prep Time: 8 minutes
Cook Time: 10 minutes
Total Time: 18 minutes

Instructions:

  1. Preheat the oven to 350°F (175°C).
  2. In a bowl, mix together the flour, sugar, baking powder, and salt.
  3. Add the oil and vanilla extract, mixing until the dough comes together.
  4. Roll the dough into 1-inch balls and place them on a baking sheet.
  5. Flatten each ball slightly with the back of a spoon.
  6. Bake for 8-10 minutes, or until lightly golden on the edges.
  7. Allow to cool on a wire rack before serving.

3. No Butter Oatmeal Raisin Cookies

These oatmeal raisin cookies are soft, chewy, and perfect for a quick snack. The applesauce used in place of butter helps keep them moist and adds a natural sweetness.

Ingredients:

  • 1 ½ cups rolled oats
  • ¾ cup flour
  • ½ cup raisins
  • ¼ cup applesauce
  • ½ cup brown sugar
  • 1 tsp baking soda
  • ½ tsp cinnamon
  • ¼ tsp salt

Prep Time: 15 minutes
Cook Time: 12 minutes
Total Time: 27 minutes

Instructions:

  1. Preheat the oven to 350°F (175°C).
  2. In a large bowl, combine oats, flour, raisins, baking soda, cinnamon, and salt.
  3. Add the applesauce and brown sugar, stirring to combine.
  4. Drop spoonfuls of dough onto a baking sheet.
  5. Bake for 10-12 minutes, or until the edges are golden brown.
  6. Let cool before enjoying.

4. No Butter Peanut Butter Cookies

Peanut butter cookies are a classic favorite, and this no butter version doesn’t skimp on flavor. With peanut butter as the base, these cookies are rich, chewy, and just the right amount of sweet.

Ingredients:

  • 1 cup peanut butter
  • 1 cup sugar
  • 1 egg
  • ¼ cup oil (vegetable or coconut oil)

Prep Time: 5 minutes
Cook Time: 10 minutes
Total Time: 15 minutes

Instructions:

  1. Preheat the oven to 350°F (175°C).
  2. In a bowl, mix together the peanut butter, sugar, egg, and oil until smooth.
  3. Roll the dough into balls and place them on a baking sheet.
  4. Press each cookie with a fork to create the classic peanut butter cookie pattern.
  5. Bake for 8-10 minutes, or until golden.
  6. Cool and enjoy!

5. No Butter Snickerdoodle Cookies

Snickerdoodle cookies are known for their cinnamon-sugar coating and slightly tangy flavor. This no butter version uses oil for a light texture and is perfect for any cinnamon lover.

Ingredients:

  • 1 ½ cups flour
  • 1 cup sugar
  • ½ cup oil (vegetable or coconut oil)
  • 1 tsp baking soda
  • 1 ½ tsp cinnamon
  • ¼ tsp salt

Prep Time: 12 minutes
Cook Time: 10 minutes
Total Time: 22 minutes

Instructions:

  1. Preheat the oven to 350°F (175°C).
  2. In a bowl, combine the flour, sugar, baking soda, cinnamon, and salt.
  3. Add the oil and mix until smooth.
  4. Roll dough into balls and coat them in a mixture of cinnamon and sugar.
  5. Bake for 8-10 minutes or until golden brown.
  6. Allow to cool before serving.

Pro Tips for Perfect No Butter Cookies

To ensure your no butter cookies come out perfect every time, here are some expert tips:

  1. Choose the Right Substitute: If you’re after a chewy cookie, oil is your best bet. For a cakier texture, try using applesauce.
  2. Don’t Overmix the Dough: Overmixing can make the cookies dense and tough. Mix until everything is just combined.
  3. Chill the Dough: If your dough is too sticky, chill it in the fridge for about 30 minutes. This will help the cookies hold their shape while baking.

FAQ Section

Can I use coconut oil instead of vegetable oil in no butter cookies?

Yes, coconut oil can be substituted for vegetable oil. It will give your cookies a subtle coconut flavor and a chewy texture.

How do no butter cookies compare to regular cookies in texture?

No butter cookies may be a little softer or cakier depending on the substitute used. Oil-based cookies are typically chewier, while applesauce-based cookies are softer.

Are no butter cookies vegan?

Yes, many no butter cookies can be made vegan by using egg substitutes like flax eggs and plant-based oils.


Conclusion

No butter cookies are a fantastic option for those looking to reduce fat without sacrificing flavor. Whether you prefer chocolate chip, oatmeal raisin, or snickerdoodles, these five easy recipes prove that you don’t need butter to enjoy a delicious, chewy cookie. So why not try them all? Your taste buds (and your waistline) will thank you! Happy baking!

No Title

February 20, 2025

Sara

Easy Chocolate Chip Cookies Without Brown Sugar (5 Ingredients!)

There’s nothing quite like a fresh batch of homemade chocolate chip cookies. Whether you’re a seasoned baker or a beginner, the smell of warm cookies filling your kitchen is always irresistible. But what happens when you’re out of brown sugar or simply prefer a lighter recipe? Don’t worry — you can still make delicious chocolate chip cookies without brown sugar! This recipe, made with only five ingredients, is incredibly easy, quick, and satisfies those sweet cravings.

In this article, you’ll discover how to make chocolate chip cookies without brown sugar, along with tips to perfect your baking technique, nutritional insights, and more. Let’s dive right in!

Why Choose Chocolate Chip Cookies Without Brown Sugar?

You might be wondering, “Why would anyone make chocolate chip cookies without brown sugar?” Well, there are a few good reasons why you should give it a try:

  1. Simplicity: Sometimes, it’s just about keeping things simple. If you’re in the middle of a baking session and realize you’re out of brown sugar, this recipe is the perfect solution. You don’t need to run to the store for that one missing ingredient.
  2. Healthier Option: Using white sugar instead of brown sugar means you’re cutting down on molasses and slightly reducing the overall sugar content. While these cookies are still a treat, this version may be a bit lighter if you’re looking to reduce some sweetness without sacrificing flavor.
  3. Texture Differences: Brown sugar adds moisture, which makes cookies chewier. But without it, your cookies might turn out a little crisper around the edges while maintaining softness in the center, a texture many cookie lovers adore.
  4. Customization: This recipe is an excellent base for adding your own twist. If you’re avoiding brown sugar for dietary reasons or personal preference, it’s easy to adapt — you can even substitute the white sugar for another sweetener if you want to go sugar-free.

What You Need to Make These Easy Chocolate Chip Cookies

As mentioned, this recipe only calls for five ingredients, and they’re all common pantry staples. Here’s a list to make sure you have everything you need before you start baking:

Ingredients for Chocolate Chip Cookies Without Brown Sugar

IngredientAmount
All-purpose flour1 1/2 cups
White sugar1/2 cup
Butter (melted)1/2 cup
Egg1
Chocolate chips1 cup

These ingredients are simple, yet they come together to create a delicious treat. The beauty of this recipe is that you don’t need any complex or hard-to-find items. In fact, you likely have all of them already!


Step-by-Step Instructions for Baking Chocolate Chip Cookies Without Brown Sugar

Now that you have all your ingredients, let’s get started with the step-by-step instructions. You’ll be enjoying fresh cookies in no time!

Step 1: Preheat and Prep

  • Preheat your oven to 350°F (175°C). This ensures that your cookies will bake evenly.
  • Line your baking sheets with parchment paper. This will prevent the cookies from sticking and make cleanup a breeze.

Step 2: Mix Ingredients

  • In a large bowl, combine the melted butter and white sugar. Use a hand mixer or a whisk to beat them together until the mixture is smooth and creamy.
  • Add the egg and mix it in until fully incorporated.
  • Gradually add the flour while mixing until the dough comes together. The dough should be slightly soft but not too sticky. If it’s too sticky, you can add a tiny bit more flour.
  • Once the flour is mixed in, fold in the chocolate chips. Make sure they’re evenly distributed throughout the dough.

Step 3: Bake

  • Use a spoon or cookie scoop to form dough balls about 1 tablespoon in size. Place them on your prepared baking sheet, spacing them about 2 inches apart.
  • Bake the cookies for 10–12 minutes. Keep an eye on them — once the edges turn golden brown, they’re ready to come out.
  • If you prefer slightly softer cookies, pull them out a minute or two earlier. For a crispier texture, let them bake a little longer.

Step 4: Cool and Enjoy

  • Allow the cookies to cool on the baking sheet for about 5 minutes before transferring them to a wire rack.
  • Once they’re fully cooled, grab a glass of milk and enjoy your warm, homemade cookies!

Tips for Perfect Chocolate Chip Cookies Without Brown Sugar

Here are a few tips to ensure your cookies turn out perfect every time:

  • Don’t Overmix the Dough: While it’s important to mix the ingredients well, avoid overmixing. Overmixing can result in dense cookies, so stop mixing once everything is combined.
  • Use Room-Temperature Butter: Cold butter can result in uneven mixing. Let the butter come to room temperature before you begin to mix for a smooth dough.
  • Chill the Dough: For thicker cookies, chill the dough for at least 30 minutes before baking. This helps prevent spreading during baking.
  • Customize the Mix-Ins: Feel free to experiment! Add chopped nuts, dried fruit, or even a pinch of cinnamon for a unique flavor twist.

Nutritional Breakdown of Chocolate Chip Cookies Without Brown Sugar

If you’re curious about the nutritional content of these cookies, here’s an estimate based on one cookie (assuming you make 24 cookies):

NutrientAmount
Calories180
Fat9g
Carbohydrates25g
Protein2g
Fiber1g

While these cookies are still a treat, they’re a bit lighter than their brown sugar counterparts, with fewer calories and a slightly lower sugar content. Of course, you can always adjust the recipe to suit your dietary needs (like using a sugar substitute or swapping out the butter for a dairy-free version).


Frequently Asked Questions (FAQs)

Q: Can I use a sugar substitute instead of white sugar?

Yes, if you want a lower-sugar or sugar-free version, you can use a sugar substitute like stevia or monk fruit. However, keep in mind that these sweeteners may alter the texture and flavor of your cookies.

Q: What’s the best way to store these cookies?

Store your cookies in an airtight container at room temperature for up to 1 week. If you need to store them longer, they freeze well for up to 3 months. Just make sure they’re fully cooled before freezing.

Q: Can I make these cookies without eggs?

Yes! If you follow a vegan diet or need to avoid eggs, you can use an egg substitute like a flax egg (1 tablespoon ground flaxseed mixed with 3 tablespoons water) for this recipe.

Q: How do I make these cookies chewier?

If you prefer chewier cookies, try adding a bit of extra butter or even a tablespoon of molasses. You can also slightly underbake the cookies to keep them softer and chewier.


Conclusion: Enjoy Your Perfect Cookies Without Brown Sugar

There you have it — a simple, delicious recipe for chocolate chip cookies without brown sugar! With just five ingredients, you can bake up a batch of cookies that will satisfy any sweet craving. Whether you’re out of brown sugar, prefer a lighter option, or just want to try something new, these cookies are sure to hit the spot.

Next time you’re in the mood for a homemade treat, don’t hesitate to whip up this easy recipe. Get creative with your mix-ins, experiment with different variations, and most importantly, enjoy every bite!


Ready to Try It?

If you enjoyed this recipe and want more baking tips, make sure to share this article with your friends and family. Don’t forget to leave a comment below and let us know how your cookies turned out! Happy baking!

No Title

February 20, 2025

Sara

Easy No Bake Banana Split Cake Recipe (5 Ingredients!)

Are you in the mood for something sweet but don’t have time to bake? If you’re craving a treat that’s quick, simple, and absolutely delicious, you’ve come to the right place. The Easy No Bake Banana Split Cake Recipe (5 Ingredients!) is everything you’ve been looking for—a mouthwatering dessert that’s perfect for any occasion. Best of all, it’s super easy to make with just five basic ingredients. No oven required!

Whether you’re throwing a last-minute party, need a quick family treat, or just want a no-fuss dessert to brighten up your day, this banana split cake is sure to please. So, let’s dive into how you can create this indulgent, no-bake masterpiece in your own kitchen.


Why You’ll Love This Easy Banana Split Cake Recipe

Quick & Simple

We all know that sometimes you don’t have hours to spend in the kitchen, but that doesn’t mean you should have to sacrifice flavor. This no-bake banana split cake comes together in just 20 minutes of prep time. With only five ingredients and no baking involved, it’s the perfect solution for busy days when you crave something delicious.

Perfect for Any Occasion

From birthday parties to casual get-togethers, this banana split cake is versatile enough to be the star of the show at any event. The layers of creamy, fruity, and chocolatey goodness will wow your guests, whether you’re hosting a special event or just enjoying a weekend treat with your family.

No Baking Required

Forget about heating up the oven—this recipe requires no baking! All you need is a fridge to set the cake, which means it’s ideal for hot summer days when you want to avoid the heat.

Kid-Friendly & Fun

Kids love banana split sundaes, and this easy no-bake version is just as fun. It’s a great way to involve your little ones in the kitchen, letting them help with assembling the layers or even adding their own favorite toppings.


What You’ll Need for This No Bake Banana Split Cake

To make this easy banana split cake, you only need five simple ingredients. Here’s what you’ll need to gather:

Table: Ingredients for Easy No Bake Banana Split Cake

IngredientQuantityNotes
Graham cracker crumbs1 ½ cupsYou can substitute with crushed cookies like Oreos or vanilla wafers
Butter¼ cupMelted
Cream cheese8 oz (softened)Full-fat preferred
Whipped topping1 cupStore-bought or homemade
Bananas2 largeSliced

These are the core ingredients you’ll need to create this dessert. Feel free to customize the toppings or switch out ingredients if you prefer. For example, you can try using a dairy-free whipped topping for a dairy-free version of this recipe.


Step-by-Step Instructions for Making No Bake Banana Split Cake

Once you have your ingredients ready, it’s time to assemble your banana split cake. Here’s how to do it step-by-step:

1. Prepare the Crust

  • Start by mixing the graham cracker crumbs and melted butter together. Stir until everything is well-combined, and the crumbs are fully coated with butter.
  • Press this mixture into the bottom of a 9×9 inch pan to form the crust. Make sure to press down firmly so that the crust holds together when chilled.
  • Place the pan in the fridge for about 10 minutes to allow the crust to firm up.

2. Make the Cream Cheese Layer

  • While the crust is chilling, it’s time to make the creamy layer. Beat the softened cream cheese until smooth and creamy using a hand mixer or stand mixer.
  • Once the cream cheese is soft and creamy, fold in the whipped topping. Continue mixing until the mixture is well combined and smooth.
  • Spread the cream cheese mixture evenly over the chilled crust. Use a spatula to make sure it covers the crust completely.

3. Add the Banana Layer

  • Slice the bananas into thin, even rounds.
  • Place the banana slices over the cream cheese layer, ensuring that the bananas are spread evenly.

4. Add Toppings (Optional)

  • Now for the fun part—toppings! While the basic recipe is fantastic on its own, you can add extra layers of flavor by sprinkling some chocolate chips, chopped nuts, or even maraschino cherries on top.
  • If you love chocolate, drizzle some chocolate syrup over the top for that classic banana split flavor.

5. Chill and Set

  • Once all the layers are added, cover the pan with plastic wrap and refrigerate for at least 2 hours to allow everything to set properly.
  • Once it’s chilled, your banana split cake will be ready to serve!

Tips for Making the Perfect No Bake Banana Split Cake

To help you achieve the best results, here are a few tips for making your banana split cake even more delightful:

  • Use Fresh Bananas: Fresh bananas will give your cake the best flavor and texture. Avoid overripe bananas, as they may get mushy after being refrigerated.
  • Chill Long Enough: Don’t rush the chilling process. Give the cake at least 2 hours to set, ensuring that the layers firm up and the flavors meld together perfectly.
  • Customize the Toppings: Feel free to get creative with the toppings! You can use chocolate chips, crushed nuts, shredded coconut, or even a drizzle of caramel sauce to add extra flavor and texture.
  • Add Whipped Cream: For an extra touch of indulgence, top your cake with a dollop of freshly whipped cream before serving.

How to Store and Serve Your No Bake Banana Split Cake

This banana split cake is best enjoyed chilled, and it’s easy to store for later enjoyment.

  • Storage: After serving, store any leftover cake in an airtight container in the fridge. It will stay fresh for up to 3 days. If you’re making it in advance, you can prepare the cake up to 24 hours before you plan to serve it.
  • Serving: Serve chilled for the best texture. If desired, garnish with additional whipped cream, maraschino cherries, or chopped nuts before serving.

Frequently Asked Questions (FAQ)

Can I make this banana split cake in advance?

Yes, absolutely! This no-bake banana split cake can be made up to 24 hours in advance. Simply store it in the fridge, and it will be ready to serve when you are.

Can I use a different crust for this recipe?

Yes, you can easily swap out the graham cracker crust for a different type of crust. Crushed Oreos or vanilla wafers also work well, giving the cake a slightly different flavor.

What can I add to the cake to enhance its flavor?

There are plenty of ways to customize this cake to your taste. You can add chocolate chips, crushed nuts, a drizzle of caramel, or even fresh berries for added flavor.

Is there a dairy-free version of this recipe?

Yes! For a dairy-free version, you can use dairy-free cream cheese and whipped topping. Be sure to check the labels to ensure the ingredients fit your dietary needs.


Conclusion

In just a few easy steps and with just five simple ingredients, you can whip up a delicious and refreshing no-bake banana split cake that’s sure to impress. Whether you’re making it for a special occasion or just because, this dessert is perfect for anyone who loves banana splits but doesn’t want the hassle of turning on the oven. Give it a try, and don’t forget to share your results with friends and family!

Ready to make your own Easy No Bake Banana Split Cake? Get started today, and enjoy the perfect combination of creamy, fruity, and chocolatey goodness in every bite. Don’t forget to share your creation with us—tag us on social media and let us know how you personalized your banana split cake!


Table Summary: Prep Time and Total Time

ActivityTime
Prep Time20 minutes
Total Time2 hours 20 minutes (including chilling)
Cook Time0 minutes (no baking)

With this easy, fun, and tasty dessert in your repertoire, you’ll always have a go-to treat that’s both quick and impressive!

No Title

February 20, 2025

Sara